The Happiness Tag

FullSizeRender[4]

A few weeks ago, I received the lovely surprise of being nominated for The Happiness Tag! What made this extra special is that it came from my dear blogging friend, Tonya, who is absolutely delightful! From the first time I visited her blog, Fourth Generation Farmgirl, I could barely pull myself away from reading, and now I eagerly look forward to each new post!

I love reading about life at Green Hill Farm, Tonya’s travel adventures with her husband, and of course, all of her sweet critters! Her sheep, Hamish, is one of my personal favorites — I’ve always wanted to keep sheep as pets! Maybe someday!

A very special thank you to Tonya for her nomination — I’m truly inspired by her kind heart and generosity!

Here are the Rules:

List:

-Five things that make you happy

-Five songs that make you happy

-Five bloggers that make you happy and notify them of your nomination

***

Five things that make me happy

1.My wonderful family — spending time with them, laughing with them, and giving them big hugs!

maze4

2.Cooking/baking with my family and friends — and while on the topic of food, chocolate makes me happy!

3.Our animals — they each have their own individual traits that make me smile. Seeing the chickens come running for treats, the bunnies hopping for joy over clover or dandelions and Marcie, our cat, who loves to cuddle!

027

4.Enjoying God’s beautiful creation and spending time with Him. The beach, the mountains, a double rainbow perfectly set in the sky. Birds chirping, children laughing, people walking by.

5.Bringing joy to others!

IMG_1260

Five songs that make me happy

Priceless – For King and Country

The River – Jordan Feliz

That’s How You Change the World – The Newsboys

Hold Me – Jamie Grace

Me Without You – TobyMac

Five bloggers that make me happy

(it was so hard to narrow this down to only five bloggers!)

Sadie from Sadie’s Nest 

Claire from Paintbox Mum

Roberta from Chorizo & Thyme

Jasmine from The Richmond Avenue

Asheton Rose from Tales of A Southern Rose

Very Berry Shortbread Sundae

IMG_1332

Happy 4th of July weekend!

Here it is the first day of July, and I’m wondering where the month of June went? Fun-filled with baby chicks, out-of-state visits from family and gearing up for one of our favorite celebrations — America’s birthday!

I’m rounding off my 4th of July desserts with a cool and creamy berry sundae complete with a lemon-flavored shortbread. But this recipe should not be reserved for the 4th of July — it can be enjoyed any day!

I want to mention that my talented husband made these beautiful dessert glasses from recycled champagne bottles! Aren’t they gorgeous? He’s busily working on his inventory and you can check out his lovely line of hand-cut glassware very soon at CucinaBellissima.com! Be looking for an official “Grand Opening” in the near future!

Very Berry Shortbread Sundae

*I prefer to use all organic ingredients when possible

For the Lemon Shortbread

*adapted from King Arthur Flour Shortbread Cookie Recipe

2 cups almond flour

6 Tablespoons coconut oil (or butter)

6 Tablespoons powdered sugar

1/4 teaspoon salt

2 teaspoons lemon juice

***

-Preheat oven to 350 degrees.

-Lightly grease a 9″ x 7″ baking dish

-In a medium mixing bowl, combine all ingredients by spoon and spread into prepared pan.

-In preheated oven, bake for 17-18 minutes, or until shortbread begins to turn a golden brown around the edges and on top.

-Remove from stove and set aside to cool completely.

For the Berry Syrup

2 cups fresh or frozen berries (I used a combination of blackberries, strawberries and blueberries)

1 teaspoon lemon juice

1 Tablespoon water

1 Tablespoon cornstarch

1/4 cup raw honey

***

-In a medium saucepan, combine ingredients and stir.

-Heat on low-medium, and as berries begin to soften, increase heat to medium.

-Continue stirring as berry sauce reaches a low simmer, and cook for approximately 2 minutes or until sauce begins to thicken.

-Remove from heat and allow to cool completely.

***

One Pint of Strawberry Ice Cream

***

When the shortbread and berry sauce has cooled, take out one pint of berry ice cream (I used strawberry) and allow to soften for easier scooping.

-Cut the shortbread into eight equal squares, and crumble one square each into four dessert glasses.

-Scoop ice cream over the shortbread, and repeat with an additional layer of shortbread. (the shortbread should be about the size of large croutons.)

-Repeat with another ice cream layer, then spoon the berry sauce over the shortbread and ice cream, allowing the sauce to drizzle down into the glasses.

-Garnish with shaved coconut, if desired.

-Serve immediately and enjoy!

Serves four

sundae

From our home to yours, have a wonderful and safe 4th of July!

Refreshing Raspberry Sparkler

IMG_1309

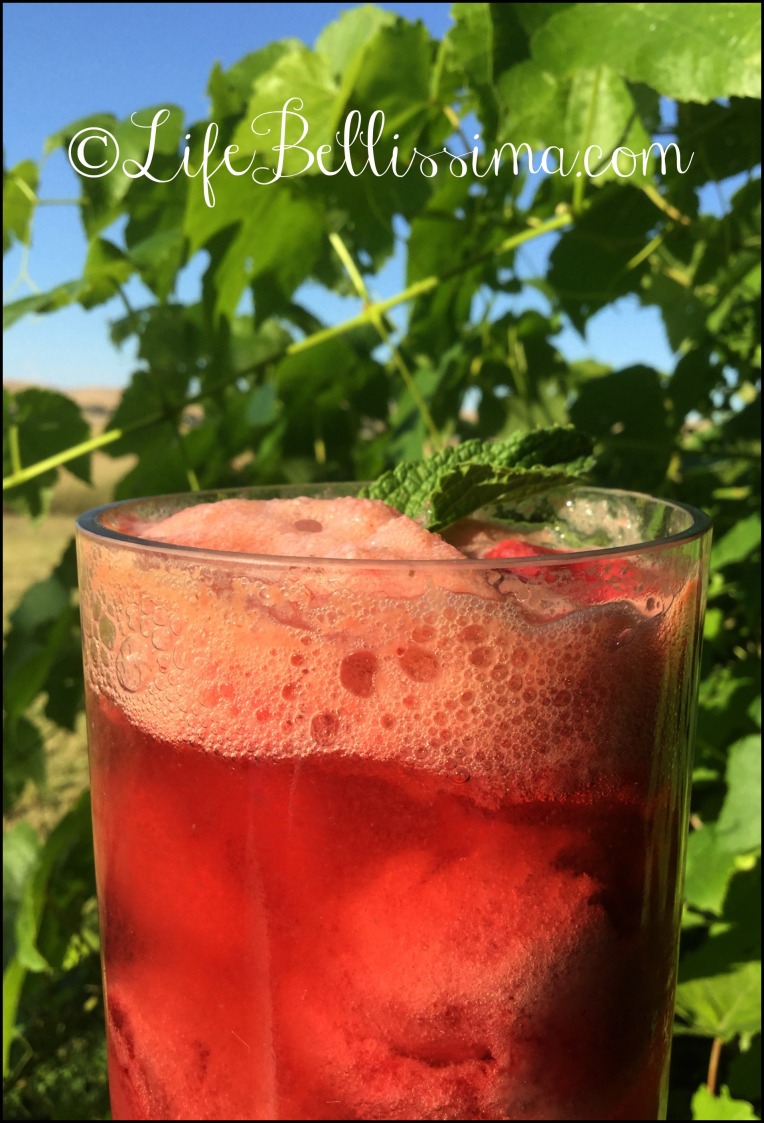
We are smack dab in the middle of a heat wave — temperatures have been reaching 100 degrees Fahrenheit (and above) this week, so we were all in need of something cool and refreshing!

Towards evening, it’s the perfect time to sit outside in the slightly cooler weather, watch the chickens and the new baby chicks (more on that in an upcoming blog, but can I at least say, they’re adorable!), swing in the hammock and keep an eye out (from a very safe distance) for a family of six, yes six!, skunks who have decided to live in our neighborhood! The mama skunk came waddling out late one evening, followed by not one, not two, but five babies waddling after her!

We enjoy having something cool to sip on while we’re outside, and I’m sure you can’t really call this a recipe, but it’s refreshing, beautifully-colored and can be put together in roughly 30 seconds — perfect when you don’t have the energy to put something together in the heat!

Refreshing Raspberry Sparkler

*I prefer to use all organic ingredients whenever possible

raspberry sorbet

raspberry soda (I use the Cran-Raspberry La Croix)

-Scoop 3-4 small round scoops of the sorbet into a glass

-Pour in the Cran-Raspberry La Croix

-Garnish with fresh mint, if desired

And that’s it. So. easy.

Now back to the hammock, chickens and keeping a watchful eye out for those skunks!

(Let’s hope my next post isn’t on 10 ways to remove skunk spray!) 

IMG_1316

Enjoy!


It’s Texas Sheet Cake, Y’all!

IMG_1257

Well howdy!

After reading the book That’s Not Hay in My Hair this month, I’ve been so inspired by the great state of Texas. Coincidently, I’ve also been missing one of my sisters who lives in Texas, so reading that particular book gave me a feeling of visiting her homestead, so to speak.

Over the years that she and her family have lived in Texas, I have detected the faintest of Texan accents emerging from my sister, and I love it! I love hearing her sweet voice exclaim, “Hey!”, “Howdy!” or “y’all!” as if she were a Texas native. It makes me smile!

So, hey howdy! I’m in the mood for baking up a Texas Sheet Cake for y’all  — which fits very nicely into our patriotic desserts leading up to the 4th of July! Barbecue, Texas Sheet Cake, sparklers and fireworks — sounds like a great 4th to me!

IMG_1244

Texas Sheet Cake

*I prefer to use all organic ingredients

for the cake:

1/2 cup butter

1/2 cup coconut oil

1 cup water

4 Tablespoons cocoa powder

***

1 3/4 cups flour

1/2 teaspoon salt

3/4 cup coconut sugar

1/2 cup raw cane sugar

1 teaspoon baking soda

***

1/2 cup buttermilk (or 1/2 cup milk with 1 teaspoon lemon juice)

2 eggs

1 Tablespoon vanilla

***

-preheat oven to 350 degrees

-In medium-sized saucepan, bring butter, coconut oil, water and cocoa to a boil; remove from heat.

-In a large mixing bowl, combine flour, salt, baking soda and sugars. Add the butter/cocoa mixture and stir with a wooden spoon.

-Add in beaten eggs, buttermilk and vanilla.

-Pour into a greased 13″ x 18″ sheet cake pan (or jelly roll pan).

-Bake for 13-14 minutes or until toothpick inserted comes out clean.

for the frosting:

1/2 cup butter, softened

1 1/2 cups powdered sugar

1 teaspoon vanilla

4 Tablespoons pure maple syrup

2 Tablespoons milk (or vanilla almond milk)

1 cup pecans, crushed

extra crushed pecans for garnishing

-With a stand mixer or hand mixer, combine butter, powdered sugar and vanilla until well blended. Add maple syrup and milk — mix until light and fluffy. Gently stir in pecans by hand.

-Immediately spread frosting over the warm cake — the frosting will melt and spread easily. Allow to cool, and top with additional crushed pecans, if desired.

This cake is incredibly moist and flavorful — the chocolate/pecan frosting gives it an extra measure of deliciousness with a subtle hint of maple.

IMG_1251

Enjoy and Happy 4th!

My First Blogiversary!

IMG_0896[3]

With great JOY, today I’m celebrating the very 1st Blogiversary of Life Bellissima!

Wow! Has it really been one whole year? Although in some ways, it feels longer because of all the wonderful experiences I’ve had while blogging!

The very first on my list is all of you!

All the wonderful friends that I have met, laughed with, shared recipes and special memories with and come to love as treasured friends!

Whether baking in my kitchen, hiking up a mountain to look for the perfect Christmas tree, picking cherries on a warm, spring day, experiencing life in the country, recalling amusing stories about our chickens, bunnies, tabby cat, Marcie, or our family, I feel like you’ve been right along with us on our journey, and it’s been a beautiful, wonderful and inspiring first year!

I look forward to many more beautiful blogging years to come — thank you for your friendship, encouragement and kindness!

Now if only we could celebrate together with a big blogiversary cake! 😉

cropped-untitled.jpg

A Father’s Day Tribute To My Dad

Being Father’s Day weekend, I have naturally been thinking a lot about my Dad. Although I think about my Dad every day. For those of you who are new to my blog, my Dad went to be with our Lord five years ago after a very courageous battle with cancer.

When someone is so very dear to you, who holds such a special place in your heart, where do you even begin? My Dad was amazing! Even though I’m his daughter, I know I’m not exaggerating — everyone loved to be around my Dad! He was a loving husband and dad, he could always make me laugh, he always greeted me with a smile, he was extremely intelligent, but equally humble. He was a gentleman, he was always willing to help others, and I love that he would root for the underdog.

One of my favorite pictures of my Dad standing by his airplane …

1461884_10203352874382747_6299651136498509656_n[1]

I have so many wonderful stories and memories to share about him! Since it is Father’s Day, I thought it would be appropriate to share some of my favorite times with my Dad — even though there are thousands!

Growing up in California, my Dad worked often worked swing shift. Because he had to commute in traffic, he had to leave for work before I got home from school, and I was already fast asleep when he arrived home — but he made certain that each and every weekend was special! We had a ritual of always getting ice-cream cones, and my Dad always took me to a particular ice cream shop that scooped huge scoops of ice-cream! He always encouraged me to get the double scoop so I could try two flavors, and if I couldn’t finish it, at least I had the wonderful experience of two flavors simultaneously running down my chin!

We made candy together, baked together, ran errands to the car parts store together, and I loved helping him work on his 1971 yellow Volkswagen Beetle! We watched football games, took donuts from the bakery to my grandparent’s house and often went for rides in the “bug” (Volkswagen Beetle) together with my Mom.

Years later, when I was old enough to drive, my Dad taught me how to drive stick-shift in the Volkswagen, then gave me the car when I turned eighteen. I still have that cute little car and think of my Dad each and every time I drive it!

On one particular outing, he was teaching me to shift gears on hills without stalling the car or rolling it backwards. Always encouraging and good-natured, my Dad stayed calm and had me laughing through my tears as I would stall the car more often than I could count! When I finally got the hang of it, my Dad rejoiced with me. Bringing joy to others was one of my Dad’s greatest gifts.

~A happy heart makes the face cheerful … Proverbs 15:13

Dad and I on my Wedding Day …

DadMe

God truly blessed me with such a wonderful Dad, and I am forever thankful. I love and miss him so much, and I rejoice knowing that one day we will see each other again!

For God so loved the world that he gave his one and only Son, that whoever believes in him shall not perish but have eternal life. ~John 3:16

Happy Father’s Day, Dad — you’re the best!


White Chocolate Chip-Cranberry Cookies

IMG_1166[1]

Continuing my patriotic theme for 4th of July celebrations, I decided on a white chocolate-cranberry cookie because one of America’s favorite desserts would have to be a delicious cookie paired with a cold glass of milk, am I right?

These cookies are soft with a slightly crispy edge — the sweetness of the white chocolate compliments the dried cranberries so very well.

We have our white and red ingredients, so my recommendation is to serve these goodies with fresh summer fruit — preferably in the blue and red colors to complete the theme. 😉

IMG_1171[2]

White Chocolate Chip-Cranberry Cookies

*I prefer to use all organic ingredients

1/2 cup butter, softened

1/2 cup coconut oil, softened

2/3 cup raw cane sugar

1/3 cup coconut sugar

1/4 cup vanilla (or plain) almond milk

1 teaspoon vanilla

2 cups flour

1 teaspoon baking soda

1/2 teaspoon salt

1 1/2 cups white chocolate chips

3/4-1 cup dried cranberries

***

-Preheat oven to 350 degrees

-With a stand mixer, hand mixer or by hand, beat together the butter, coconut oil and sugars.

-Add the vanilla and almond milk, mix well.

-Gradually blend in the flour, baking soda and salt until well combined, but not overmixed.

-Gently fold in the white chocolate chips and cranberries.

***

Scoop into rounded tablespoons (a cookie scoop works great!) and bake for 8-10 minutes or until edges are a soft golden brown.

-Cool for 2-5 minutes before transferring to a plate.

IMG_1174[2]

Enjoy on the 4th as well as any day of the year!


That’s Not Hay in My Hair – Book Review

26309307[1]

Written by the talented young author, Juliette Turner, That’s Not Hay in My Hair is the endearing true story of a young girl and her mom who move from the hustle and bustle of New York City to the wide-open spaces of a 300-acre ranch in Texas.

Together, this delightful mom and daughter team experience the joys and adventures of ranch life — along with Longhorn cattle, horses, dogs and a cat! Beautifully-written, Ms. Turner draws you in from the very first page, weaving together a combination of laughter, tears and inspiration to the very last page. I had a difficult time putting this book down, and actually wished I could continue reading more about their life on the ranch. Her writing has me longing to take my family on a Texas vacation!

From kindly neighbors who live several miles away to visits from the author’s grandparents, I felt as though I had met them all and was visiting the great state of Texas with all its charm and hospitality!

The recommended age for readers is age 8-12, but I completely disagree — I believe readers of all ages, especially those who have a heart for animals, will thoroughly enjoy this book!

*In exchange for my honest review, I was given a free copy of this book. All opinions are my own.

*Photos courtesy of Google images

The author, Juliette, with her mom, Janine

MND_janine[1]


Chocolate Chip-Almond Butter Muffins

IMG_1111[1]

We recently found out that our youngest has multiple food allergies to wheat, bananas, egg whites, tomatoes and peanuts. Today I baked my first batch of coconut flour muffins for her to sample, and I have to say, I was pretty impressed with how coconut flour works!

I have always wanted to try baking with various flours. I’ve done a few recipes with almond flour and really enjoy its nice nutty texture. Today I decided to give coconut flour a try.

First, I did some reading up on coconut flour which was extremely helpful! Coconut flour is ultra absorbent, so you don’t need near the amount as regular flour. (no wonder they sell coconut flour in smaller bags!) 😉 In addition, coconut flour requires an increase in bonding agents such as eggs or milk.

This was really a trial run to see if I could produce moist muffins with a delicious flavor. As I couldn’t use peanut butter, I opted for almond butter which my daughter has been enjoying. The girls and I were quite pleased with the results, so without further ado, I give you Chocolate Chip-Almond Butter Muffins made with coconut flour, coconut sugar and coconut oil to boot! 😉

IMG_1116[1]

Chocolate Chip-Almond Butter Muffins

*I prefer to use all organic ingredients

4 whole eggs

1/2 cup coconut oil, melted

1/4 coconut sugar

1/4 cup raw honey

1/2 cup almond butter

1 teaspoon vanilla

1/4 cup vanilla almond milk

3/4 cup coconut flour

1/2 teaspoon baking soda

1/4 teaspoon kosher salt

3/4 cup chocolate chips

additional chocolate chips and shaved coconut

-Preheat oven to 350 degrees.

-With a stand mixer, hand mixer or by hand, beat eggs until light and fluffy. Add coconut oil, sugar, honey, almond butter, vanilla and almond milk and mix until well blended.

-Gently add in coconut flour, baking soda and salt until well incorporated.

-Another great tip I read was to let your batter sit 4-5 minutes so that the coconut flour will have time to absorb the liquid. The mixture will end up looking somewhat like pumpkin puree.

-Gently fold in chocolate chips.

-Spoon into cupcake liners approximately 3/4 full. Sprinkle additional chocolate chips and coconut flakes on top and bake for 15-16 minutes, or until inserted toothpick comes out clean.

-Allow to cool 10-15 minutes.

Enjoy!

IMG_1113[1]